Blast away that fat around your tummy and get a slim, sexy look – without spending hours in the gym.
A High Intensity Interval Training (HIIT) workout involves a number of exercise performed at almost maximum capacity for 30-60 seconds, with only a short rest between the different exercises.
Once you complete the entire set of exercise, then you take a break of 60 to 90 seconds. After your short break, you complete the exercises from start to finish all over again. The intensity is unlike anything you have experienced before, and you’ll be able to feel the difference immediately.
The Seven Minute Belly Fat Blast HIIT Workout
The focus of this workout is to increase core strength while improving your endurance and stability. Because it is so intense, you will be burning body fat – not just around your midsection. If you are just starting out, it is recommended to complete this workout 2 to 3 times per week. If you are more advanced, then you can eventually increase the number of days you complete the workout or the total number of sets.
Do this workout for 2 – 4 rounds depending on your level of training. Duration of each exercise:
- 30 sec – beginners
- 60 sec – intermediate/advanced
Burpees

- Put feet shoulder-width apart.
- Lower your body into a squatting position, placing your hands on the floor in front of you.
- Kick your feet back so that you are in push-up position. Keep your hands firmly on the ground to support your body.
- Do a push-up. Bring your chest back up.
- Stand up, and then jump into the air while clapping your arms overhead.
Also check out these 8 burpee variations.
Bicycle Crunches
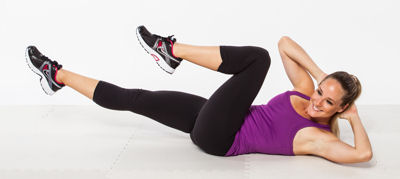
- Lie down facing up, and bend your knees so your feet are flat on the ground.
- Keep your back straight and shoulders back and bring your upper body up until you can see over your knees.
- Put your hands behind your head and elbows out.
- Bring your right knee closer to your chest reach your left elbow to your knee, alternating quickly.
Hindu Push-up
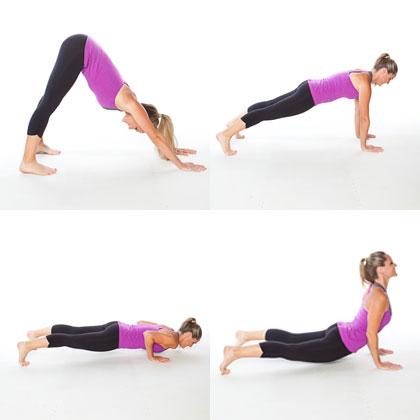
- Start with a regular push up position, but with your feet wider than your shoulders.
- Move your hands back towards your feet, so that your butt is up in the air.
- Arms and legs should be straight. From a distance, you will look like an upside down “V”
- Bend your elbows so your body comes forward, and your hips go down towards the ground.
- Bend your spine so you are looking up at the sky.
- Straighten your arms. Breathe out as you look up.
- With your arms still straight, return to the original position.
Mountain Climbers
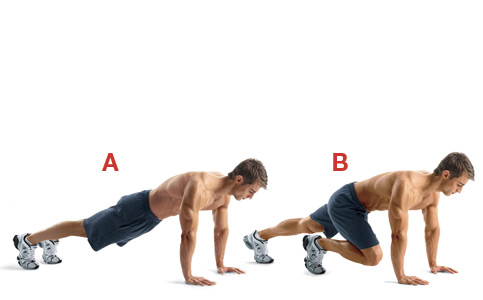
- Come to a hands and knees position on the floor with your toes pointed toward the floor.
- Your hands should be slightly ahead of your shoulders and your fingers pointing forward.
- Bring your left foot forward and place it on the floor under your chest. Your knee and hip are bent and your thigh is in toward your chest.
- Lift your right knee off the ground, making your right leg straight and strong. Your right toes are tucked under, heel up.
- Brace your abdominal muscles to stabilize your spine. Pull your shoulder blades down and back.
- Keeping your hands firmly on the ground, your abdominals engaged and shoulders strong, jump to switch leg positions.
Lying Leg Raise
- Use a bench if there’s one available. Letting your legs hang off the edge will increase your range of motion
- Place your hands under your glutes with your palms facing down. Keep your legs as straight as possible, and hold a dumbbell between your feet if you want added resistance.
- Slowly raise your legs perpendicular to the floor. Hold the contraction at the top for a second, then slowly lower your legs to the start position.
Variations: You can also perform this exercise on a mat on the floor just by placing your arms to the sides or your arms under your glutes.
Superman
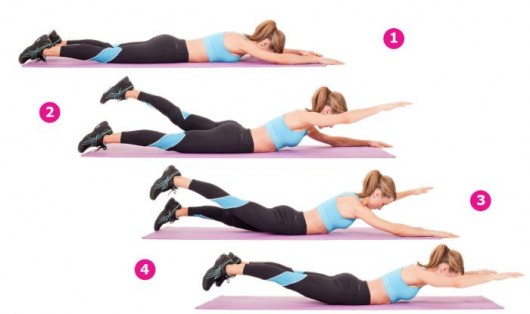
- Lie face down on your stomach with arms and legs extended. Keep your neck in a neutral position.
- Keeping your arms and legs straight (but not locked) and torso stationary, simultaneously lift your arms and legs up toward the ceiling to form an elongated “u” shape with your body — back arches and arms and legs lift several inches off the floor.
- Hold for two to five seconds and lower back down to complete one.
Side Plank

- Lie on your right side with your legs straight.
- Lift yourself up with your right forearm so your body forms a diagonal line. Rest your left hand on your hip.
- Brace your abs and hold for 60 seconds. If you can’t make it to 60 seconds, hold for 5 to 10 seconds.
- Be sure your hips and knees stay off the floor.
- Change the sides.
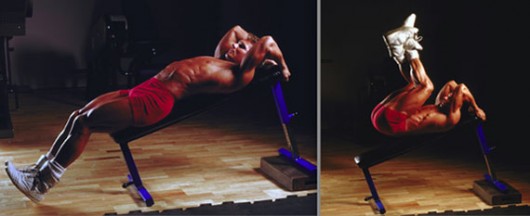
Seated Flat Bench Leg Pull-In
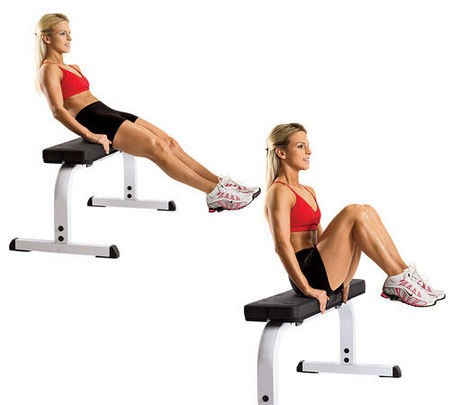
- Sit on a bench with the legs stretched out in front of you slightly below parallel and your arms holding on to the sides of the bench. Your torso should be leaning backwards around a 45-degree angle from the bench. This will be your starting position.
- Bring the knees in toward you as you move your torso closer to them at the same time. Breathe out as you perform this movement.
- After a second pause, go back to the starting position as you inhale.
- Repeat for the recommended amount of repetitions.
Variations: You can also perform this exercise on a mat on the floor just by placing your arms to the sides.
Plank
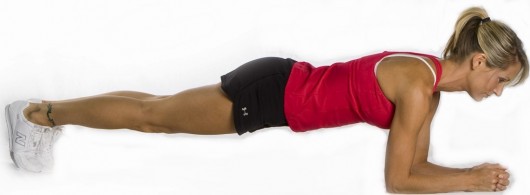
- Start off in the pushup position. Starting with the pushup position is the easiest way to get into the plank.
- Lower both your forearms to the ground so that both your elbows and fists are flat to the ground. Your palms should be balled up, and directly underneath your shoulders.
- Curl your toes under and engage your abs by tilting your pelvis and pulling your belly button toward your spine.
- Straighten your body but keep your neck and spine neutral. Imagine that you’re a plank of wood, and that you’re straight as an arrow.
- Flex your abdominals and squeeze your glutes. These are the two major muscle groups you’ll be working out in this exercise.
- Hold this position, also known as the plank, until after the burning begins. Keep your eyes on the floor in front of you. Avoid raising your behind. Your body should make a straight line from your heels to the back of your head.
Further reading: